- IN THE NEWS X
- It’s time to clear your advance tax liability
- Seniors need to submit Forms 12BBA, 15G, 15H to save on TDS: Experts
- How investing in 54EC bonds can help you save tax on long-term gains
- New income tax forms are out for new assessment year 2022-23. Find out which one you should use
- New ITR forms need income disclosure from foreign retirement a/cs
- Why is March 31 an important date for taxpayers? Find out
- Not filed ITR yet? Face penalty or even jail term, say analysts
- March 15 Is The Last Date To Pay Advance Tax: Time To Clear Your Liability
- It's time to deduct TDS if rent exceeds Rs 50,000, say analysts
- Clarification on capital gains tax on early redemption of Sovereign Gold Bonds is required – Here’s why
- Second amendment to LLP Rules will ease procedural burden: Experts
- Three Things To Keep In Mind Before Investing In RBI’s Sovereign Gold Bonds
- Tackle low liquidity in sovereign gold bonds by laddering, say analysts
- CBDT, tax tools make e-filing of I-T returns simpler
How to e-Verify Your Income Tax Return
Written by Gagandeep Arora - Printed on - Date - 28th Aug 2022
After filing
your income tax return, the next step is to verify it. The income tax department
processes your return only if it is verified. Hence, you will receive refunds only if
the return is submitted and verified.
After successfully e-verifying your ITR, you don’t have to send the
physical ITR-V. However, if you do not want to e-verify, you will need to send the
physical ITR-V. There are various methods by which you
can e-verify your ITR.
Steps to e-Verify Your Tax Return
An individual files an ITR if his income exceeds the basic exemption limit which changes according to age. All those above 60 years pay tax only if the limit exceeds Rs.2.5 lakhs. Those above 60 and below 80 enjoy exemption up to Rs.3 lakhs, and for super senior citizens, no tax is charged. There are many benefits following filing the tax return even if you earn below the taxable limit.
- Generate Aadhaar OTP
- Existing Aadhaar OTP
- Existing EVC
- Generate EVC through a bank account
- Generate EVC through the Demat account
- Generate EVC through bank ATM option (offline)
Method 1: e-Verification Through Aadhaar OTP
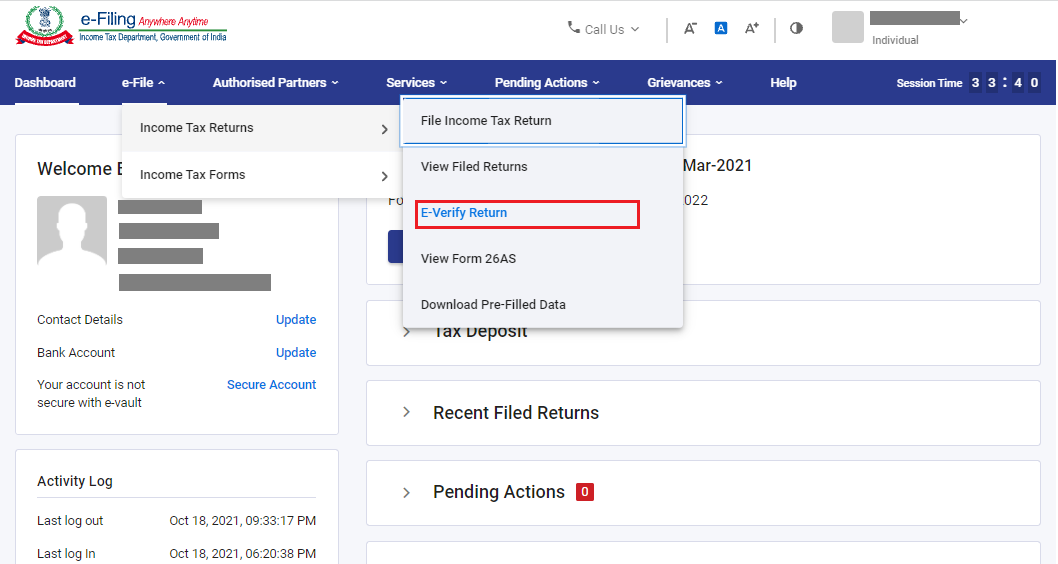
- Firstly, log in to your e-filing account at www.incometax.gov.in. Under the e-file tab select Income Tax Returns > e-Verify Return.
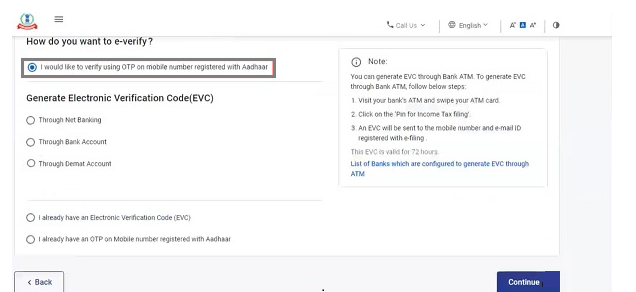
- In the ‘e-Verify Return’ page, select the method of e-verification.
For e-verification of your ITR through Aadhaar, ensure that your mobile number is linked to Aadhaar. Also, ensure that your PAN is linked with your Aadhaar number. Let us now see the steps for e-verification.
- Under the e-verify return page, select ‘I would like to e-verify using OTP on a mobile number registered with Aadhaar.
- A pop-up will appear on your screen. You will be required to select the tick box saying ‘I agree to validate my Aadhaar details’ and click on the ‘Generate Aadhaar OTP’ button.
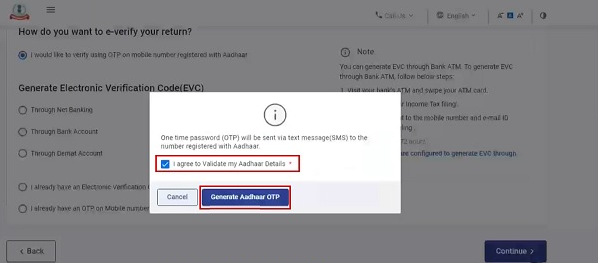
An SMS with the 6-digit OTP will be sent to your registered mobile number.
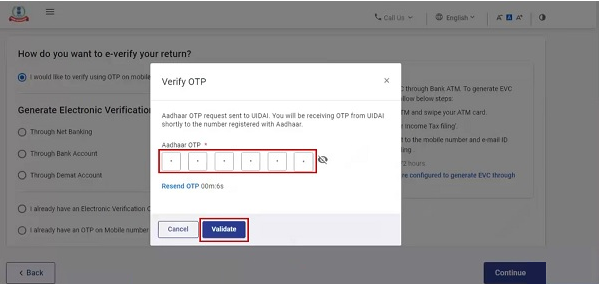
- Enter the OTP received in the box where it is required and click on the ‘Submit’ button. On successful submission, your ITR will be verified. OTP is valid only for 15 minutes.
Most of the taxpayers apply the Aadhaar OTP method for e-verification.
Method 2: e-Verification Through Aadhaar OTP Already Available
- If you already have Aadhaar OTP available with you, you can select option ‘I already have an OTP on Mobile number registered with Aadhaar’.
- Enter the OTP below and click on the ‘Continue’ button. If the OTP is successfully verified, this will complete the e-verification process.
e-Verification Through Electronic Verification Code (EVC)
Another way to e-verify your account is by generating EVC through:
- Net banking,
- Bank account, or
- Demat account
Method 3: e-Verification Through Net Banking
If you want to e-verify through a net banking facility, you need to have a net banking facility of your bank account.
- On the ‘e-Verify’ page, you can select ‘Through Net Banking’ and click on the ‘Continue’ button.
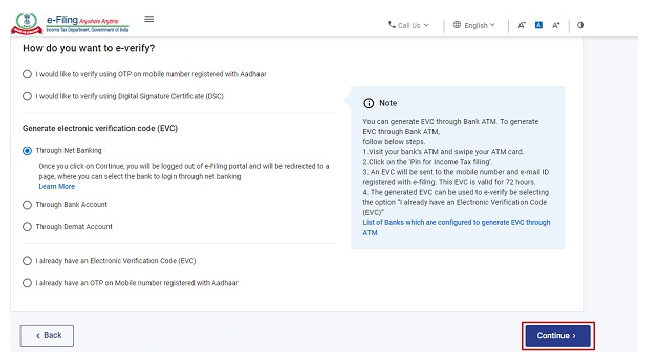
- In the next step, you can select the bank through which you want to verify your ITR and click on the ‘Continue’ button.
- Read the disclaimer and click on the ‘Continue’ button.
- Next, it will redirect you to log in to Net Banking of your bank account. Click the link related to log in to e-filing account from your bank’s net banking website.
- You will be again redirected to the e-filing portal. Go to the respective ITR form and click on ‘e-verify’, and your tax return will be e-verified successfully.
Method 4: e-Verification Through Bank Account
- You must have a prevalidated bank account to verify through a bank account and generate EVC. Pre-validation of a bank account is a must for receiving an income tax refund.
- EVC will be generated through this method and sent to your mobile number and email ID registered with your prevalidated and EVC-enabled bank account.
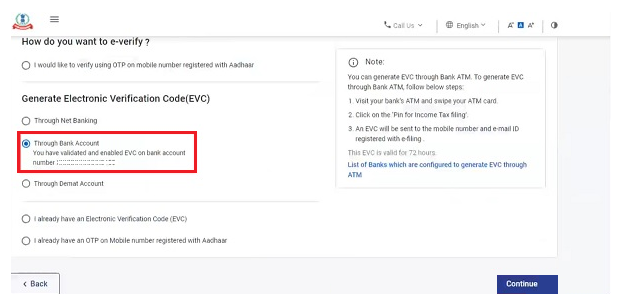
- Enter the EVC received and click on the ‘e-verify’ button.
Method 5: e-Verification Through Demat Account
- Verifying ITR via a Demat account is similar to verification via a bank account.
- The only difference is that the EVC will be generated and sent to your mobile number and email ID registered with your prevalidated and EVC-enabled Demat account. Enter EVC and click on the ‘e-Verify’ button.
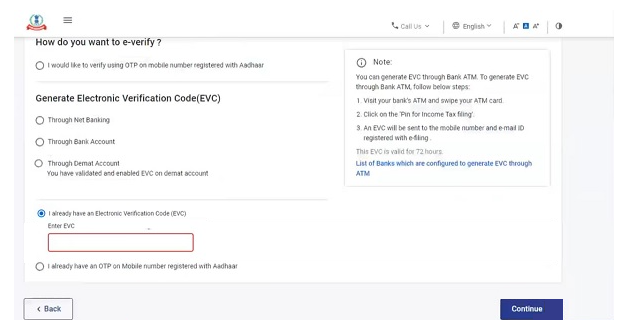
Method 6: e-Verification Through Bank ATM
There is another offline method of generating EVC. It is through bank ATM cards. This facility is available only via limited banks such as Canara Bank, Axis Bank, Central Bank of India, SBI, ICICI Bank, IDBI Bank, and Kotak Mahindra Bank. All you will require is to visit your bank’s ATM and swipe your ATM card.
- Enter your ATM PIN and select ‘Generate EVC’ for income tax return filing.
- An EVC will be sent to your mobile number and email ID registered with the e-filing portal. It is important to note that your PAN must be registered with the bank.
- Next, log in to your account and select ‘I already have an Electronic Verification Code (EVC)’ under the e-verify page. Enter the EVC code and click on e-verify.
You can use the above methods for ITR verification if your books of accounts are not audited.
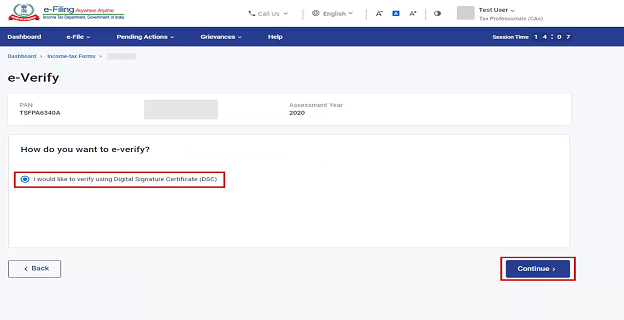
Method 7: e-Verification Using Digital Signature Certificate
However, if your books of accounts are audited, the return must be e-verified using a Digital Signature Certificate (DSC).
- On the e-verify page, select the option ‘I would like to e-Verify using Digital Signature Certificate (DSC)’.
- On the Verify with Digital Signature Certificate (DSC), select ‘Click here to download emsigner utility’.
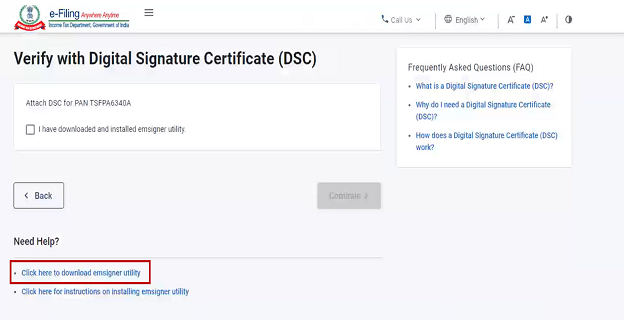
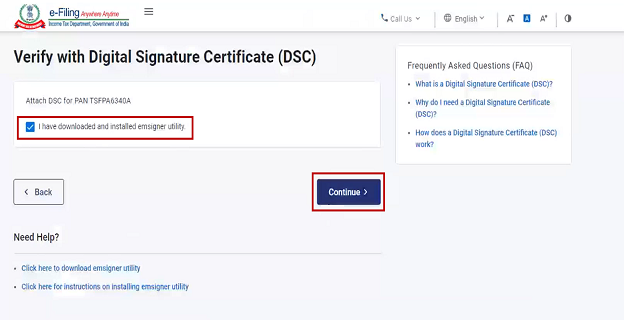
- After you download and instal the emsigner utility, come to the e-filing page again, select the option ‘I have downloaded and installed emsigner utility’ on verify with Digital Signature page, and click on the ‘Continue’ button.
- Select ‘ provider ‘ and ‘ certificate’ on the next screen, and enter the password. Next, click on the ‘Sign’ button.
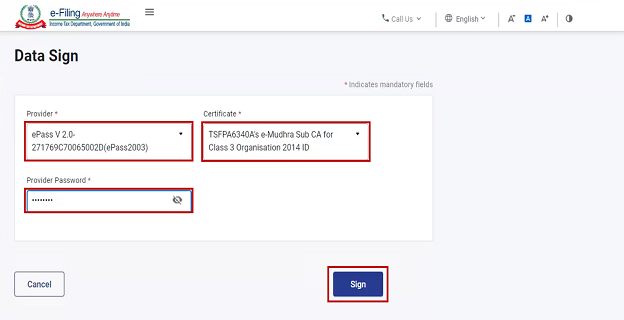
You will receive a message on your email ID and mobile number registered on the e-filing portal confirming the completion of e-verification.